Spirit Mk3 Dual Morse Paddle Instructions
Please note: This page is currently being updated to the new MK3 instructions.
Basic Setup
Connecting to your Equipment
Included in the box with the key were a 3ft long audio cable and an adaptor.

1. Connect the 3.5mm /1/8th inch lead to the socket in the back of the key.
2. Connect the other end to your electronic keyer or radio, using the 1/4 inch adaptor if required.
3. You may need to configure your electronic keyer or radio for proper function. Please refer to your equipment instructions for this step.
Paddle Travel - Contact Gap Spacing
Included in the box with the key were two hex wrenches.

These two hex wrenches should be everything you need to adjust the key to your preferences.
1. Remove the lid with the four screws.

2. Locate the contact set screws:
With the paddles in the standard configuration, the set screws should be visible on the top of the paddles:

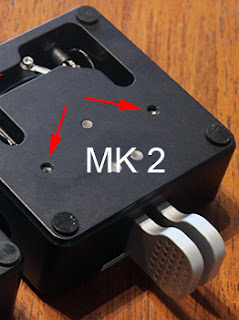
With the paddles in the taller configuration, the set screws are on the underside of the paddle and are accessed through the two holes on the underside of the key as indicated by the red arrows below:

It's a good idea to hold the paddles in place with one hand when turning the key over to stop the paddles from sliding off their pivots:

3. Loosen the contact set screw on the paddles you want to adjust half a turn.
4. Using the long arm of the same hex wrench, pass it through the smallest hole on the OPPOSITE side of the base to the paddle you want to adjust. The key passes through the nearest paddle to engage the contact in the other paddle.

5. In the picture above, the smaller wrench is inserted into the right side of the key to adjust the travel of the left paddle. Clockwise rotation makes the contact travel smaller, for less movement. Anti-clockwise for more movement.
The contact is usually set a quarter turn (a 90 degree turn) back from touching when originally set.
The pitch of the screw is 32 turns per inch, so a quarter turn is about 8 thousandths of an inch.
6. Once you have it adjusted just as you like, tighten the set screw 1/2 turn to lock it in place.
7. Repeat for the other paddle if required.
8. Replace the lid and its four screws.
Adjusting the paddle pressure
The Spirit Morse Key uses rare-earth magnets to provide consistent paddle pressure and return.
The magnet holders are adjustable using the larger hex wrench.

There is no need to remove the lid for this operation (the picture above shows it removed for clarity).
1. Insert the larger wrench into the large magnet holder socket as shown above.
2. Clockwise rotation makes the magnet move nearer to the paddle for increased pressure. Anti-clockwise rotation moves the magnet further away for reduced pressure.

Each magnet holder is also held in place with a set screw and a small white ball.


2. Locate and loosen the contact set screws:
6. Once you have it adjusted just as you like, tighten the set screw 1/2 turn to lock it in place.
7. Repeat for the other paddle if required.
8. Replace the lid and its four screws.
NOTE: If you have an intermittent contact issue with either paddle, this is usually due to the paddle set screw being left too loose. Please carefully tighten the contact set screw a little more - the contact below it needs to make good contact with its thread to make a consistent electrical connection.
Adjusting the paddle pressure
The Spirit Morse Key uses rare-earth magnets to provide consistent paddle pressure and return.
The magnet holders are adjustable using the larger hex wrench.

There is no need to remove the lid for this operation (the picture above shows it removed for clarity).
1. Insert the larger wrench into the large magnet holder socket as shown above.
2. Clockwise rotation makes the magnet move nearer to the paddle for increased pressure. Anti-clockwise rotation moves the magnet further away for reduced pressure.
We set the magnets to four complete turns out from completely seated when assembling keys.
(Try not to wind it out more than seven or eight full turns from fully seated - don't go past the point where the magnet holder is flush with the surface, shown below. If you do, please see the note below.)

Each magnet holder is also held in place with a set screw and a small white ball.

The small white ball and set screw are accessible from the underside of the key as shown by the red arrows below.

NOTE: If you wind the magnet screw out significantly, more than 7 or 8 complete turns, the small white ball mentioned above may come loose and drop inside. If the large magnet holder is wound out further than flush with the edge, remove the magnet holder completely, remove the set screw from that side, and remove the white ball. It may need a push with the small Allen key. Then replace the magnet holder all the way in, replace the white ball, and retighten the set screw until just snug. Readjust the paddle pressure as required.
Swapping the Paddle Heights
The Mk3 is originally set up with the paddles in a standard, lower position.
Before attempting this, please familiarize yourself with the basic adjustments above.
Follow the instructions below to convert them to the higher paddle position:
1. Remove the lid:


3. Back off both contacts a couple of turns:


4. Slide both paddles carefully off the pivot posts and remove both silver washers that are below them:

5. Flip the key over and remove the magnet set screws and small white ball from each hole:


6. Remove both magnet holders, using the larger Allen wrench:

7. Check you have all the components shown:


9. Adjust the right paddle gap from the left side:

10. Replace a washer onto the left post and slide the paddle without the white dot on the magnet onto the left post and adjust from the right:

11. Hold the paddles in place while you turn the key over:

12. Tighten both contact set screws through the access holes as shown:

13. Replace the lid:


You can see the dot on the paddle magnet inside to check before screwing it in:

We set the magnets to four complete turns out from completely seated when assembling keys.
15: Insert the other magnet holder without the white dot on the left-hand side.
16: Add a white ball and set screw into each of the corresponding holes on the underside and tighten until snug:
